LUOMO is an expressive and responsive theme for Tumblr created by PixelMoxie. LUOMO is designed to display your media at large sizes in big style, giving you great control over each post color palette. With LUOMO, you can tailor each post to complement the way your content looks and feels. LUOMO adapts to the screen size of the device you’re using to view it—your content will look awesome on any device!
Features
Retina Ready LUOMO is now retina ready, and includes high-res icons and graphics. The images and icons used on LUOMO user interface are neatly organized on standard and high resolution sprites, and their PSD sources are included for you to modify if necessary.
Bespoke Color Palette For Each Post
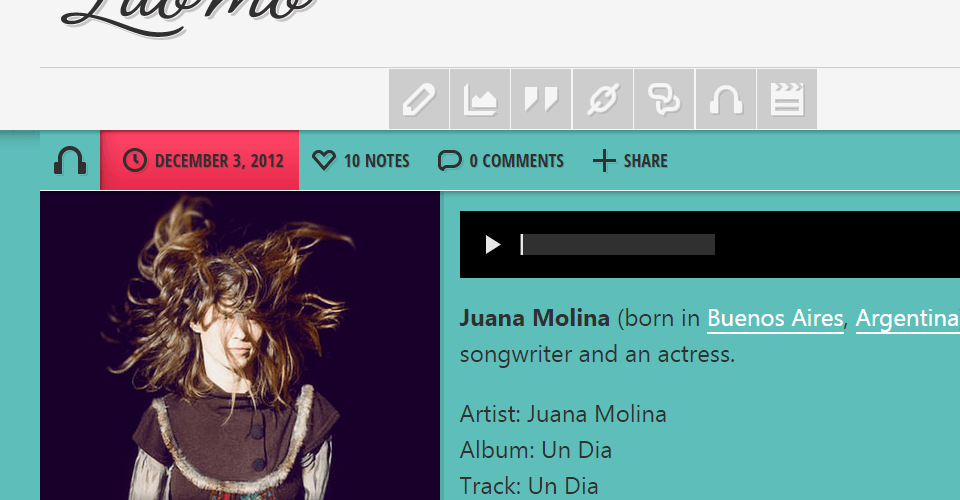
In LUOMO, posts in the index page alternate between dark and light. You can define background, text and accent colors for the generic dark and light posts—but that’s just the tip of the iceberg. LUOMO comes with a predefined array of colors, allowing you to set a post background color by simply tagging it with that particular color name. You can access different variations of a color using the tags “desaturate”, “darken” and “lighten”—so, a post containing the tags #blue, #darken and #desaturate, will have a darker and less saturated hue of the color blue. And that’s not all—you can even break free of the included color palette by using a set of custom tags targeting individual post colors. Read more about colors in the customization section.
Filter Posts By Tag Updated in version 1.2 LUOMO features an icon-based post filter that fallbacks to an stylized dropdown menu on smaller screens. The filter includes items for each post type—including “answer”, which is disabled by default in the dashboard when you first install the theme. To make your posts filterable, simply tag them according to their type: “text”, “photo”, “quote”, “link”, “chat”, “audio”, “video” and “answer”. You can enable or disable any individual filter at any time.
Since version 1.2 you can set the “label” and “slug” for each post type.
Text Based Post Filter New in version 1.2
Now you can choose to display text instead of icons on the post filter menu, change each item “label” and “slug”, and even define up to ten custom tags of your own!
Responsive Photosets Improved in version 1.3
Since version 1.3, LUOMO lets you choose between a grid—like layout or a FlexSlider powered image slider for your photosets. Photosets are displayed as sliders by default, but you can choose the grid layout for all your sets, or on a per-post basis by adding a specific tag to your posts.
Twitter Feed
Display your latest tweets on the blog footer by simply authorizing the app with Twitter on your blog’s settings page. Your tweets will be shown using LUOMO bespoke twitter widget—or you could replace it with Twitter’s native embedded timeline if yo prefer.
Flickr, Dribbble And Instagram Feeds
Populate your Flickr feed with photos from an individual user account or a group pool. Since version 1.1 you can display your Instagram images and Dribbble shots as well on the footer.
Audio And Video Embeds
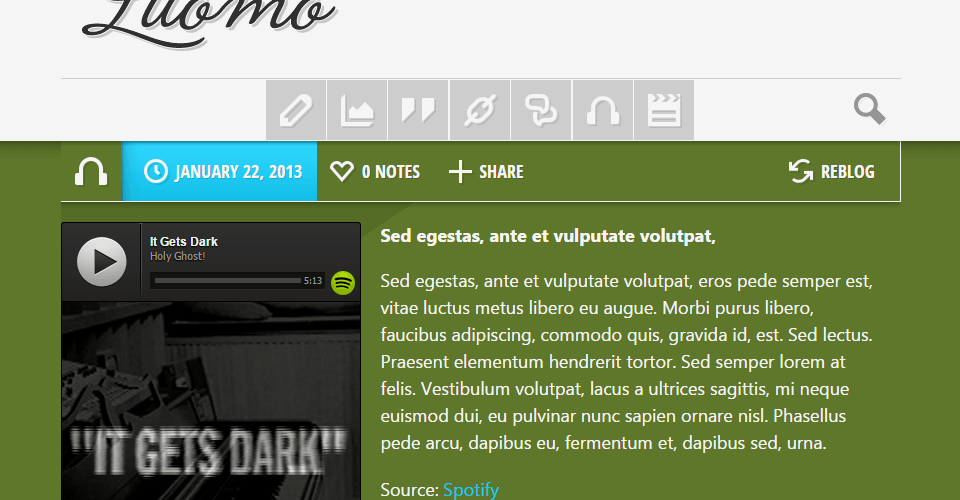
Since version 1.3.2, LUOMO provides better support for Tumblr’s native video player, Instagram and Vine videos, and Soundcloud and Spotify audio embeds.
HTML5 Audio Player
MP3 files you upload directly from your computer or devices will be reproduced by LUOMO’s bespoke HTML5 audio player powered by jPlayer.
Disqus Commenting System
Includes support for Disqus comment count and threaded comments.
User Defined Fonts
Define a custom font stack (system fonts) for body text and Google Web Fonts families and weights for posts and footer headings.
Optional Media Queries
If your content gets a little too wide, you can disable the two wider media queries that cater to larger screen sizes.
Custom Image Logo
Upload your own logo image (you can optionally upload a retina version of it too) and set its width and height. Use the provided logo PSD templates if you need help placing the logo in the allocated space.
Support For All Post Types LUOMO offers support for the following Tumblr post types: text, photo/photosets, quote, link, chat, audio, video, and answer.
Support For User Defined Pages
Create new static pages on the customizer and check the option “Show a link to this page” so they show up on the Navigate section on the blog footer. LUOMO offers support for Ask and Submit pages as well.
Social Icons
Display as many social icons as you need on your blog’s header. The included services are: Behance, Blogger, DeviantART, Dribbble, Facebook, Flickr, Google+, Instagram, LastFM, LinkedIn, MySpace, Picasa, Pinterest, SoundCloud, Twitter, Vimeo, YouTube, Quora and 500px
More Features
At any time, you can enable or disable most of the theme features by simply toggling an option on the theme customizer:
Show or hide ID3 info on audio posts.
Show or hide blog description.
Show or hide copyright info.
Show or hide post content source.
Show or hide post rebloged info.
Show or hide post tags.
Show or hide post sharing button (AddThis popup).
Enable or disable clicking through images.
Enable uppercasing for posts and footer headings.
Enable Flickr group pool feed (default is public feed).
Added in version 1.1
Option the keep the logo centered at any screen resolution.
More media queries can be optionally disabled, making the desktop experience closer to the mobile one.
Better control over posts typography: define font sizes for body text and headings for phones, tablets and desktop devices.
Responsive back-to-top button.
Better control over footer appearance: enable/disable footer columns and individual widgets and move widget to alternative locations.
LUOMO internal custom tags (named color variables, like “red”, “green” and “desaturate”) are now hidden from visitors.
Compatibility LUOMO is compatible with all modern browsers and devices, including: Firefox, Chrome, Internet Explorer 9, Safari, iPhone, iPad and Android.
Installation
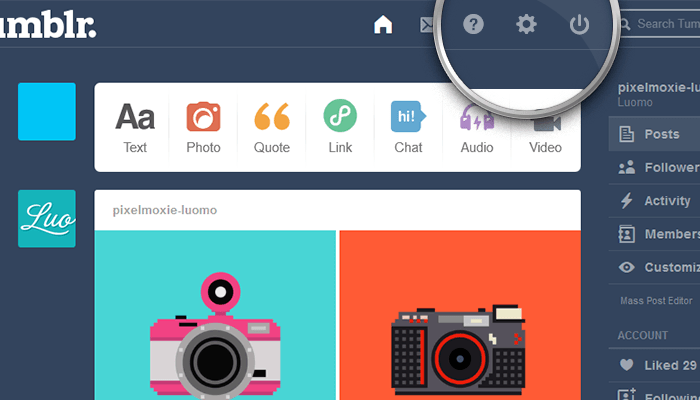
Log into your Tumblr account and head on to your dashboard.
Click on the “gear” icon at the top of the page, and once on the Settings page, select the blog you want to install the theme on from the list on the right, if you have more than one blog listed under your account.
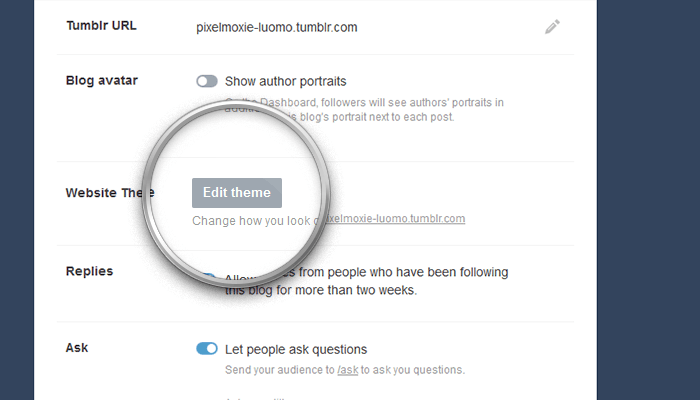
Click on the Edit Theme button—you will be taken to the Theme Customizer.
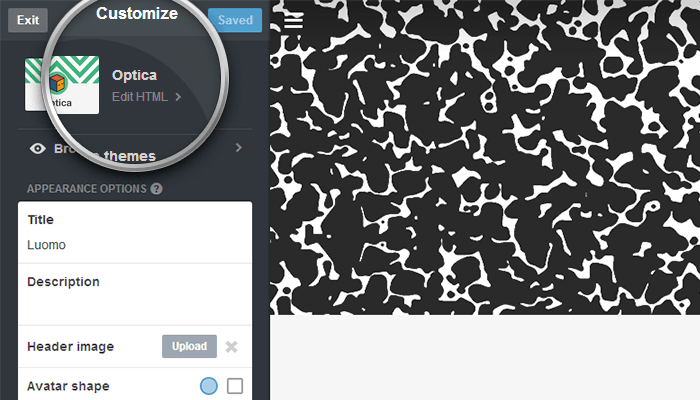
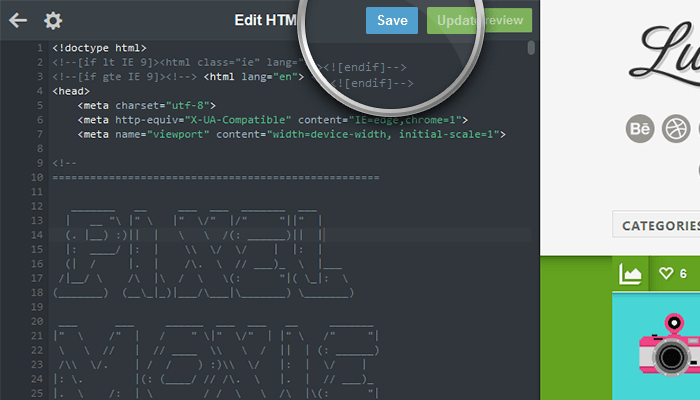
Once on the customizer, click on the Edit HTML hyper-link.
Open the .zip archive you downloaded from ThemeForest, and on the “theme” folder, select either pixelmoxie-luomo-1.3.2.html or pixelmoxie-luomo-1.3.2.txt. The two files are identical, the only difference being the file extension. If you have trouble opening or editing the HTML file, go for the text file instead.
Open the file using your favorite HTML or a plain text editor. If you’re working with TextEdit on a Mac, you want to follow the steps outlined on this article so TextEdit is properly configured to work with HTML documents. Or you could download a copy of TextWrangler.
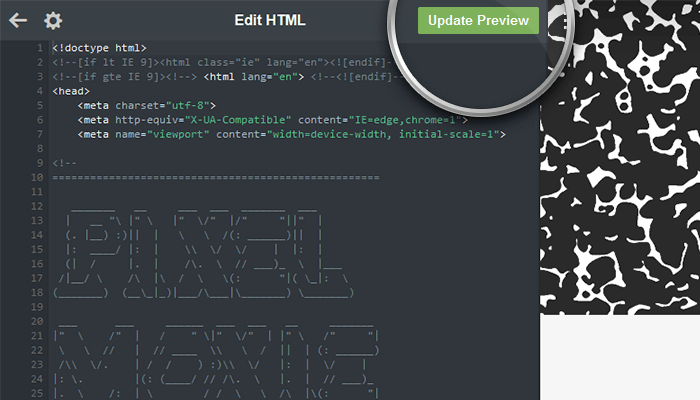
Select the file’s entire content and copy it, then paste it on Tumblr’s HTML editor, replacing the code of your previous theme entirely. Make sure the result looks similar to the image below. If you see some gibberish instead of those tags, the installation process won’t be successful.
Click on Update Preview, wait until the preview refreshes and click on Save. There’s a good chance the live preview won’t look quite right until you refresh your browser window, so do that and check the changes.
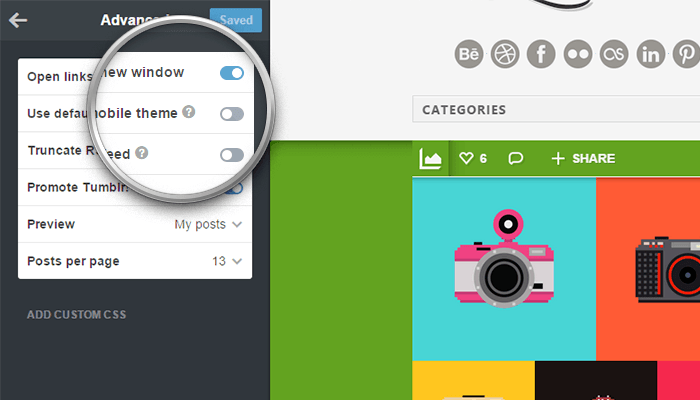
Scroll down to the bottom of the customizer and go into the Advanced options section. Make sure Use default mobile theme is off, unless you want to display Tumblr’s generic mobile layout on phones. Now it’s a good time to set the Posts per page option as well.
Customization
Your Custom Logo
The first step on making your Tumblr site unique should be to brand it with your own logo. You need to upload your logo as a PNG image with a transparent background. The default logo is 300px wide by 140px tall. Your logo can be any size, but we recommended that is no wider than that. You’ll also need to specify your logo’s dimensions for it to display correctly. You can optionally upload a High-res or retina version of you logo.
Use the Logo and Logo HiDPI image fields to upload your logo images, and specify your logo’s dimensions using the text inputs Logo width and Logo height.
Important: if you decide not to upload the retina version of your logo, you need to “clear” the default one. To do so click on Logo HiDPI and select Remove.
Make use of the included PSD logo templates if you need help with logo placement. It’s recommended that you include the necessary whitespace around the logo in your image—however, you can toggle the option “Enable Extra Padding Around Logo” if you need a little breathing space above and below. In the “psd” folder you’ll find the files logo.psd and logo@2x.psd.
Open the logo.psd file, select a typeface and enter the desired text—or if you have your logo in a raster or vector format already, place it on the document and center it. Trim any unnecessary transparent pixels but make sure to leave enough whitespace to give your logo some breathing space. Make sure to center the logo vertically and that the margins on the left and right are identical.
Repeat the same process for the retina version of you logo, or upscale logo.psd by 200% and save it as logo@2x.psd. Once you’re done, hide the background layer and export both files as PNG images with transparency using the “Save for web” command. You could process your images with Optimizilla to further optimize their size.
The font used on the included PSDs is called Mission Script by Lost Type.
Header And Footer Colors
The following site-wide options will define the colors applied to your blog header and footer.
Variable name
Description
Default value
Header Background
Header main background color
#f5f5f5
Mobile Filter Label Background
Background color of the mobile filter label
#f2f2f2
Mobile Filter Label Border
Border color of the mobile filter label
#d9d9d9
Mobile Filter Label Inset
Color of the mobile filter 1px inset highlight
#ffffff
Mobile Filter Dropdown Bg
Background color of the mobile filter dropdown menu
#d9d9d9
Mobile Filter Dropdown Bg Hover
Background color of the mobile filter menu items when hovered
#cccccc
Mobile Filter Text Color
Text color of the mobile version of the filter
#666666
Mobile Filter Text Color Hover
Text color of the mobile filter items when hovered
#333333
Desktop Filter Border
Color for the desktop filter top border
#cccccc
Desktop Filter Item Bg
Background color of the desktop filter items
#cccccc
Desktop Filter Item Bg Hover
Background color of the desktop filter items when hovered
#999999
Desktop Filter Text Color
Color for the desktop filter text
#f5f5f5
Footer Background
Background color of the blog footer
#343332
Footer Text
Text color of the blog footer
#9a9998
Footer Link
Text color of the blog footer hyperlinks
#f5f5f5
Footer Link Hover
Text color of the footer hyperlinks when hovered
#00ccff
Pagination Background
Background
#40403f
Pagination Text
Text color of the footer pagination
#f5f5f5
Disqus Thread Accent
Accent color for the Disqus thread—it will be applied to all hyperlinks
#00ccff
Generic Post Colors
Posts in LUOMO will alternate between dark and light. By default, odd posts will be darker, while even posts will be lighter. You can “force” a post to be dark or light by simply tagging it with the dark or light words. The following variables control the posts generic palette.
Variable name
Description
Default value
Dark Post Background
Background color of the dark posts
#494f50
Dark Post Text
Text color of the dark posts
#f5f5f5
Dark Post Accent
Background color of the dark posts info bar items when hovered
#00ccff
Dark Post Link
Text color of the dark posts hyperlink
#00ccff
Dark Post Link Hover
Text color of the dark posts hyperlinks when hovered
#f5f5f5
Dark Post Link Hover Bg
Background color of the dark posts hyperlinks when hovered
#333333
Light Post Background
Background color of the light posts
#afb5b6
Light Post Text
Text color of the light posts
#333333
Light Post Accent
Background color of the light posts info bar items when hovered
#00ccff
Light Post Link
Text color of the light posts hyperlinks
#007A99
Light Post Link Hover
Text color of the light posts hyperlinks when hovered
#333333
Light Post Link Hover Bg
Background color of the light posts hyperlinks when hovered
#f5f5f5
Slider Control Nav Normal
Color of the photoset slider navigation controls
#333333
Slider Control Nav Hover
Color of the photoset slider navigation controls when hovered
#f5f5f5
Predefined Color Palette
LUOMO comes with a built-in selection of colors you can use on individual posts. To color a particular post, simply tag it with the name of one of the predefined colors. Please note that this will change the post background color only—other values like text and hyperlinks colors will be unaffected. The included palette consists of sixteen named colors, and desaturated, darker and lighter variations. To access the variations, use the desaturate, darken and lighten tags alongside the particular color. The chart below shows each color and its variations with their corresponding tags.
#red
#red#desaturate
#red#darken
#red#desaturate#darken
#red#lighten
#red#desaturate#lighten
#vermilion
#vermilion#desaturate
#vermilion#darken
#vermilion#desaturate#darken
#vermilion#lighten
#vermilion#desaturate#lighten
#orange
#orange#desaturate
#orange#darken
#orange#desaturate#darken
#orange#lighten
#orange#desaturate#lighten
#gold
#gold#desaturate
#gold#darken
#gold#desaturate#darken
#gold#lighten
#gold#desaturate#lighten
#yellow
#yellow#desaturate
#yellow#darken
#yellow#desaturate#darken
#yellow#lighten
#yellow#desaturate#lighten
#lime
#lime#desaturate
#lime#darken
#lime#desaturate#darken
#lime#lighten
#lime#desaturate#lighten
#green
#green#desaturate
#green#darken
#green#desaturate#darken
#green#lighten
#green#desaturate#lighten
#forest
#forest#desaturate
#forest#darken
#forest#desaturate#darken
#forest#lighten
#forest#desaturate#lighten
#sea
#sea#desaturate
#sea#darken
#sea#desaturate#darken
#sea#lighten
#sea#desaturate#lighten
#sky
#sky#desaturate
#sky#darken
#sky#desaturate#darken
#sky#lighten
#sky#desaturate#lighten
#blue
#blue#desaturate
#blue#darken
#blue#desaturate#darken
#blue#lighten
#blue#desaturate#lighten
#indigo
#indigo#desaturate
#indigo#darken
#indigo#desaturate#darken
#indigo#lighten
#indigo#desaturate#lighten
#purple
#purple#desaturate
#purple#darken
#purple#desaturate#darken
#purple#lighten
#purple#desaturate#lighten
#magenta
#magenta#desaturate
#magenta#darken
#magenta#desaturate#darken
#magenta#lighten
#magenta#desaturate#lighten
#lipstick
#lipstick#desaturate
#lipstick#darken
#lipstick#desaturate#darken
#lipstick#lighten
#lipstick#desaturate#lighten
#torch
#torch#desaturate
#torch#darken
#torch#desaturate#darken
#torch#lighten
#torch#desaturate#lighten
For example, a post with the tags #desaturate #darken #lime would look like this.
Bespoke Post Colors
If you feel like none of the included colors is right for your content, or want your accent and link colors to complement its background, you can get really specific by using the following tags, where xxxxxx is the color hexadecimal value.
bg_xxxxxx
Color of the post background.
info_xxxxxx
Color of the post info bar background.
accent_xxxxxx
Post accent color. It applies to the info bar items when hovered and to hyper-links, if a specific color is not set.
link_xxxxxx
Color of the post hyper-link text.
No matter what background color of your post, LUOMO will try to make its text readable by “guestimating” the background color luminosity and applying the corresponding CSS classes. Sometimes though, even the best guess can be a mismatch, or you may prefer dark or light text against your chosen background. You can always “pin” a post as light or dark by using the dark and light tags. A post with the tag #dark will always have light text and icons, while a post with the tag #light will do the opposite.
For example, a post with the tags #bg_5ebdb8 #accent_ff1a40 #link_ffffff would look like this:
Body Text Font Stack
LUOMO uses your operating system’s fonts for body text, and you can specify your desired font stack. The default one is "Segoe UI", Tahoma, Helvetica, sans-serif.
Here’s a few sans-serif font stacks that could also work well. Use the Body Font Stack option to change it.
Futura, “Trebuchet MS”, Arial, sans-serif;
“Gill Sans”, “Gill Sans MT”, Calibri, sans-serif;
“Trebuchet MS”, “Lucida Grande”, “Lucida Sans Unicode”, “Lucida Sans”, Tahoma,  sans-serif;
“Helvetica  Neue”, Helvetica, Arial, sans-serif;
Verdana, Ge neva, sans-serif;
“Lucida Gra nde”, “Lucida San    s Unicode”, “Lucida Sans”, Geneva, Verdana, sans-   serif;
Segoe, “Segoe UI”, “Helvetica Neue”, Arial, sans-serif;
Calibri, Candara, Segoe, “Segoe UI”, Optima, Arial, sans-serif;
Google Web Fonts
You can choose from Google’s vast library of fonts to style some of the theme elements—simply enter the font family name and weight into the corresponding text options. The following fonts options are available:
Variable Name
Default/allowed values
Post Header Font Family
Open Sans
Post Header Font Weight
600
Post Header Text Transform
none|capitalize|uppercase|lowercase
Post Filter Font Family
Open Sans Condensed
Post Filter Font Weight
600
Post Filter Font Size
16
Post Filter Text Transform
none|capitalize|uppercase|lowercase
Post Info Font Family
Open Sans Condensed
Post Info Font Weight
700
Footer Header Font Family
Open Sans
Footer Header Font Weight
300
Footer Header Text Transform
none|capitalize|uppercase|lowercase
Pagination Font Family
Open Sans
Pagination Font Weight
400
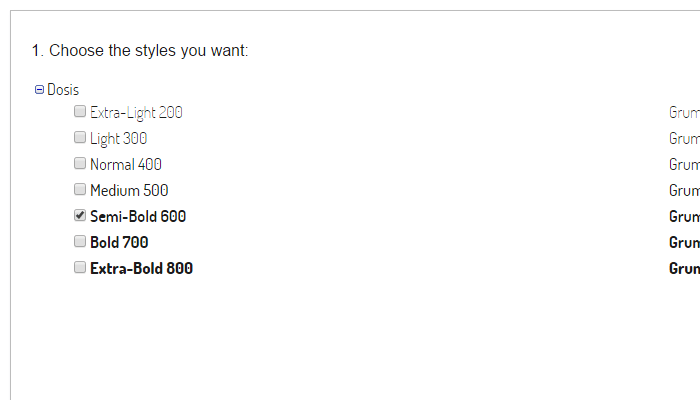
In the example below, the font family name would be Dosis, and its weight 600.
Head over Google Fonts to discover more fonts. This theme uses Open Sans and Open Sans Condensed by default, in various weights. We love it as it’s a nice looking, versatile, well executed font.
For the post info bar, a narrower or condensed typeface is needed, as there’s quite a bit of info to display. We feel Open Sans Condensed works great for this. Dosis is another great alternative.
Setting Font Sizes
You can define font sizes for body text and headings for phones, tablets and desktop devices:
Variable Name
Default values
Body Font Size Phone
16
Body Font Size Tablet
18
Body Font Size Desktop
24
Post Header Font Size Phone
18
Post Header Font Size Tablet
27
Post Header Font Size Desktop
36
Footer Font Size
14
Footer Header Font Size
24
Photoset options
For your photoset posts, you can choose between a photoset-grid layout or an image slider. Photosets are displayed as sliders by default, but you can activate the photoset-grid layout site-wide by toggling the option Enable Photoset Grid Layout. You could also activate the photoset-grid layout for individual posts only by using the tag _photo_grid on said posts.
The Photoset Gutter option will set the gutter between cells on the photoset grid. The default value is 0, for a gapless grid. If you want some space between the cells, enter a greater number without units—a value of 10 will result on a 10px margin between images, for example.
When displaying photosets as sliders, you have a few more options to control its behavior:
Enable Slider Autostart
Whether or not the slideshow will start automatically on page load. We recommend you turn this option off if your slider images are not all of the same size, as this will make the contents below the slider jump up and down when the slider transitions between images.
Slider Animation
You can enter fade or slide.
Slider Animation Speed
Transition speed in milliseconds, defaults to 500.
Slider Slideshow Speed
When autostart is enabled, this is the interval between each slide transition, in milliseconds. Defaults to 5000, or five seconds.
Show Slider Captions
When displaying a photoset as an image slider, the individual images’ captions aren’t shown by default, to keep the slider look uncluttered. Enabling this option will push the slider pager dots underneath the slides to make room for the caption, which will inherit the post’s background color.
Disabling Media Queries
If you ever feel your content gets too wide, you can disable media queries as you see fit, making the desktop version of your site closer in look to the mobile version. Media queries should be disabled sequentially, toggling the corresponding options in the following order:
Enable 1440px Media Query
Enable 1280px Media Query
Enable 1024px Media Query
Using The Post Filters
The menu underneath the logo allows visitors to filter your posts by tags matching Tumblr post types. To make your posts filterable, simply tag them according to their type (use the tags text, photo, quote, link, chat, audio, video and answer).
You can enable or disable the menu icons for any individual post type by toggling the options Enable Post Filter [Post Type] (Answer is unchecked by default.)
The Icon Based Post Filter
As of version 1.2, LUOMO allows you to define both the “label” and the “slug” to be used with each one of the post filter menu items. That means that you can keep using the same icons as always, but having them point to another tag of your choice.
For example, setting the options Filter Label Photo to kitten pics and Filter Slug Photo to pictures, would mean that the Photo icon would now point to http://pixelmoxie-luomo.tumblr.com/tagged/pictures, and when hovered, “kitten pics” will be the displayed title.
The Text Based Post Filter
As of version 1.2, LUOMO includes the option to use just text for your post filter menu and do away with the icons altogether. To do that, you need to switch on the option Enable Text Based Post Filter.
When using this option, you can define both the text to be shown for each filter (the label) and the actual tag the filter should point to (the slug).
You’re not longer limited to the Tumblr post types either, you have the option to set up to ten user defined tags of your choice. Remember that the standard tags can be disabled individually, and user defined tags will always show up after them on the menu.
Important: if you specify custom tags for the filter, the option Enable Text Based Post Filter must be on. Those items won’t show up if the option is off.
When using the text based post filter, you may want to adjust the relevant color variables to taste. We find that dark text on a light background works better in this case.
If the filter menu gets too wide, you can enable the mobile version of the filter for the wider layouts. The following options must be enabled sequentially, as needed:
Enable Mobile Filter For 1024px Layout
Enable Mobile Filter For 1280px Layout
Enable Mobile Filter For 1440px Layout
Enable Mobile Filter For 1600px Layout
The following variables apply to the new filter menu functionality, introduced in version 1.2:
Variable Name
Description
Filter Custom Label [1-10]
User defined labels for the post filter.
Filter Label Text
Label for the “Text” post type. Will be shown on the mobile menu and on the desktop menu tooltip.
Filter Label Photo
Label for the “Photo” post type.
Filter Label Quote
Label for the “Quote” post type.
Filter Label Link
Label for the “Link” post type.
Filter Label Chat
Label for the “Chat” post type.
Filter Label Audio
Label for the “Audio” post type.
Filter Label Video
Label for the “Video” post type.
Filter Label Answer
Label for the “Answer” post type.
Filter Slug Text
The “slug” (last segment on the URL the menu item points to) for the “Text” post type. You’ll need to tag your posts accordingly if you change this value.
Filter Slug Photo
The “slug” (last segment on the URL the menu item points to) for the “Photo” post type.
Filter Slug Quote
The “slug” (last segment on the URL the menu item points to) for the “Quote” post type.
Filter Slug Link
The “slug” (last segment on the URL the menu item points to) for the “Link” post type.
Filter Slug Chat
The “slug” (last segment on the URL the menu item points to) for the “Chat” post type.
Filter Slug Audio
The “slug” (last segment on the URL the menu item points to) for the “Audio” post type.
Filter Slug Video
The “slug” (last segment on the URL the menu item points to) for the “Video” post type.
Filter Slug Answer
The “slug” (last segment on the URL the menu item points to) for the “Answer” post type.
Enable Post Filter [Post Type]
Enable or disable the filter for individual post types.
Enable Mobile Filter For [1024, 1280, 1440, 1600]px Layout
Display the mobile version of the post filter (dropdown) on larger screen resolutions. Useful when the menu gets too wide otherwise for certain layouts.
Enable Desktop Filter Dark Icons
Useful when using a dark color for the menu items background.
Using the HTML5 Audio Player
Toggle the Enable HTML5 Audio PLayer option to use a modern player compatible with most modern browsers to reproduce audio files hosted by Tumblr—MP3 files you upload from your computer or devices.
Browsers that can natively play MP3 files include: Safari, Mobile Safari iOS4 (iPad, iPhone, iPod), Chrome and IE9. Firefox and Opera do not support MP3 files and will use a Flash solution, so they need to have the Flash plugin installed if this option is active.
Drawback: when using the HTML5 audio player, play count won’t increment with each play and thus it won’t be shown.
Footer Columns And Widgets
You can disable the blog’s footer columns and widgets individually, and move widgets to alternate locations other than the default ones. These are the relevant options:
Variable Name
What It Does
Enable Footer Copyright
Enable the footer copyright notice
Enable Footer Credits
Enable the footer theme credits
Enable Footer First Column
Enable the footer first column
Enable Footer Second Column
Enable the footer second column
Enable Footer Third Column
Enable the footer third column
Enable About Widget
Enable the footer About Widget
Enable Dribbble Widget
Enable the footer Dribbble Widget
Enable Flickr Widget
Enable the footer Flickr Widget
Enable Instagram Widget
Enable the footer Instagram Widget
Enable Navigation Widget
Enable the footer Navigation Widget
Enable Twitter Widget
Enable the footer Twitter Widget
Move About Widget To Column [2, 3]
Move the About Widget from its default location
Move Dribbble Widget To Column [1, 2]
Move the Dribbble Widget from its default location
Move Flickr Widget To Column [1, 2]
Move the Flickr Widget from its default location
Move Instagram Widget To Column [1, 2]
Move the Instagram Widget from its default location
Move Navigation Widget To Column [2, 3]
Move the Navigation Widget from its default location
Move Twitter Widget To Column [1, 3]
Move the Twitter Widget from its default location
Twitter Feed
To display your tweets, you first need to authorize Tumblr to access your Twitter account information. Go to the Settings page (the “gear” icon at the top), select your blog from the right sidebar if you have more than one, and click on the Share on Twitter button. You will be asked to “Authorize Tumblr to use your account”. Click on Authorize app and you will be taken back to your dashboard. You’ll see a Share posts on your Twitter switch—turn this on only if you want each published post to be shared on Twitter.
Make sure the widget is enabled (Enable Twitter Widget) and set the number of tweets to display (Twitter Count). You can change the widget title (Twitter Widget Title) and and toggle the visibility of your Twitter avatar (Enable Twitter Avatar).
If you’d rather display Twitter’s own Embedded Timeline, you need to enable the option Enable Twitter Embedded Timeline and enter the code for your timeline (Twitter Embedded Timeline Code).
You can create your own embedded timeline using the new timeline settings page on twitter.com. Make sure to customize your widget (dark or light theme, link color, height, domain to embed the widget on) and once you’re done, copy the generated code.
Flickr Feed
Use this tool to find your Flickr user or group id. Just enter the address of your photostream or group pool and it’ll find the number for you.
Enter your Flickr ID and then enable the Flickr widget (Enable Flickr Widget). You can use an individual or group pool ID, but if pooling from a group, you need to toggle the option Enable Flickr Group Feed to switch to the right API. Set the number of images to retrieve in the Flickr Count field. You can also change the title of the widget (Flickr Widget Title).
Dribbble Feed
Displaying shots from your Dribbble account is just as easy. Make sure the Dribble widget is enabled (Enable Dribbble Widget) and enter you Dribbble Username. Edit the fields Dribbble Count and Dribbble Widget Title to control the numbers of shots to display and the title for the widget.
Instagram Feed
Displaying your Instagram feed requires an extra piece of info. Besides your Instagram User ID, you’ll need an Instagram Access Token. Go to jQInstaPics homepage, scroll down and press the Retrieve my details bro! button to get your details. After signing in to Instagram you should be redirected back to jQInstaPics homepage, and your details should be displayed in the following format:
Your User ID is: 309546888
Your Access Token is: 309546888.674061d.879f8f19f2a94b29ad5d9fb7135bb658
Edit the Instagram Count and Instagram Widget Title if needed.
Titles And Labels
Variable Name
Description
Default value
Ask Label
Label for the “ask me anything” link on the blog footer
Ask me anything
Submit Label
Label for the “submit a post” link on the blog footer
Submit a post
Categories Dropdown Title
Displayed on the mobile version of the post filter
Categories
About Widget Title
Title for the footer About Widget
About Me
Dribbble Widget Title
Title for the footer Dribbble Widget
Dribbble Shots
Flickr Widget Title
Title for the footer Flickr Widget
Latest From Flickr
Instagram Widget Title
Title for the footer Instagram Widget
Instagram
Twitter Widget Title
Title for the footer Twitter Widget
Latest Tweets
Social Icons And Services
Your social icons will be displayed on your blog’s header. Make sure to enter the URL for each service you want to display using the options URL [Service Name], and make sure to include the http:// portion at the beginning of the URL!. The option Enable Social Links needs to be on.
Icons are available for the following services: Behance, Blogger, Dribbble, Facebook, Flickr, Google+, deviantART, Instagram, LastFM, LinkedIn, MySpace, Picasa, Pinterest, Quora, SoundCloud, Twitter, Vimeo, YouTube and 500px.
Other Options
Google Analytics ID
The tracking code for your Google Analytics account.
AddThis Profile ID
Enter your AddThis Profile ID to have access to analytics reports.
Enable Audio ID3 Info
Show or hide ID3 info from audio posts.
Enable Blog Description
Show or hide your blog description on the footer.
Enable Centered Logo
Keeps the logo and social media icons centered at any screen size.
Enable Click Through Photos
Clicking on photos takes you to the full-size image or a user defined target.
Enable Extra Padding Around Logo
Add an extra 20px padding above and below the logo if you need a little breathing space.
Enable Flickr Group Feed
Only enable this if your Flickr ID corresponds to a group pool, as opposed to an individual user.
Enable HTML5 Audio PLayer
Swaps the default Flash audio player for an HTML5 compatible one.
Enable Image Feed Alt Styling
Alternative styling for the footer’s image feeds, with extra spacing
Enable Linkable Quotes
If this is checked, quotations text will act as a permalink to the full post.
Enable Post Content Source
Show or hide info about the page where the content was originally posted.
Enable Post Notes
Show or hide post notes on permalink pages.
Enable Post Reblogged From
Show or hide original source from reblogged posts.
Enable Post Sharing
Show or hide sharing link on post info bar (AddThis popup).
Enable Post Tags
Show or hide post tags on the post footer.
Enable Social Links
Show or hide all of the social links on the blog header.
Enable Twitter Avatar
Show or hide the twitter user avatar on the Twitter Feed.
Enable RSS Button
Toggle the visibility of the “RSS” menu item on the footer navigation.
Enable Archive Button
Toggle the visibility of the “Archive” menu item on the footer navigation.
Enable Search Button
Toggle the visibility of the “Search” button on the blog’s header.
Posts Per Page
Set the number of posts per page to display (Under the “Advanced options” section).
Add custom CSS
Add your own CSS rules to modify the look of your site without touching the source code—for advanced users only!
Icon Sprites
If you fine tune the color of the text for the dark and light posts, you may want to change the icons to match. Inside the “psd” folder, you will find the following files: luomo_icons.psd, luomo_icons@2x.psd, social_icons.psd, and social_icons@2x.psd.
Make any changes you need in Photoshop and export the normal and high DPI sprites as PNG images with transparency using the “Save for web” command, then use the following image upload fields on the customizer to use the new files: LUOMO UI Icons, LUOMO UI Icons HiDPI, LUOMO Social Icons, and LUOMO Social Icons HiDPI.
Support
Thank you for purchasing LUOMO, we truly appreciate your business!
If after reading this guide you still need help setting up your theme, or if you find a bug that needs to be ironed out, you’re welcome to contact us via the contact form on our ThemeForest profile page.
A note on older version of Internet Explorer
Although this theme officially supports Internet Explorer 9 and up and other moderns browsers, some measures have been taken so the site doesn’t look completely broken on older versions of IE. Internet Explorer 7 and 8 will be served the mobile layouts with a very basic styling—color customizations will not be applied—so it won’t look pretty, but content should be accessible nonetheless.
Credits & Thanks
Resources
The following resources have been used in the making of this theme: